Monday, April 30, 2012

5 Free Software To Add Taskbar To Extended Multiple Monitor On PC

Windows is no doubt one of the best operating system as it allows and gives more freedom to you in terms of what you to do it to make it more personalized and take control of various things directly into your hands, you can make it do in way you want to do it for you unlike Mac Os and I mean this and can give more than 10 examples of the same.
One such good feature which I like a lot is Multi Monitor Setup which is in built in windows as shown in the image below.
3 Free Software To Add Taskbar To Extended Multiple Monitor On PC
But the thing which I miss the most is that once you have multiple monitor setup running in windows, you wont see the taskbar in the extended monitor – so apart from the primary monitor all the extended monitor will be without the taskbar which seems much relevant to me.
But if there is problem in terms of missing feature in windows there is solution to the same by installing a software and most of the time this software is free to use so you don’t have to pay almost for everything like Mac OS X.
Some tools for windows that could add a taskbar to extended monitor and do a lot more are mentioned below.
Actual Multiple Monitors – This software is something that could provide you a taskbar on every monitor you have connected to your PC but with a start button, add icons to extended multiple monitor desktop area, open date and time properties just like the primary monitor windows taskbar, you can pin items to taskbar, you will see live previews of the windows opened in extended multiple monitors, you will access to have jump lists and almost any other feature which you see in the windows taskbar and yes its free as well.
Actual Multiple Monitor
Multimonitor taskbar is another freeware which extends Windows 7 taskbar on multiple monitors attached to your system. The program lets you quickly minimize or maximize application windows from any extended monitor and not just the primary one. It provides you the option to move windows easily from one monitor to other.
MultiMon Taskbar
Nvidia NVIEW Desktop Management – It gives you maximum flexibility and unprecedented control of a single or multiple display environments. nView provides the right set of tools to navigate through their system’s information reducing lost time while maximizing productivity. It provides Intuitive interface for easy display management. 
>  Customizable desktop by various usage models 
>  Robust IT management tools for easy deployment and maintenance 
>  Tested compatibility with industry-leading business applications 
>  Proven stability — over millions of enterprise installations

Multi Monitor View Features
Some other free software which does the same thing are, Dual Monitor which works with Windows 7 and Windows Server 2008 R2 and provide the following features like.
  • Taskbar on the second monitor
  • Pinned programs
  • Aero support
  • Window manager
  • Mirror mode
  • Auto-Hide
  • Notification area
  • Start Button (BETA)
90% of the users using it recommend it to others.
On the other hand, ZBar is another utility for those who use multiple monitors. ZBar will:
  • Put a taskbar across the top or bottom of all non-primary screens with one or two rows of buttons, in six styles, with an optional clock
  • Provide keyboard shortcuts to move windows one screen along
  • Organize your desktop wallpaper one image per screen or one image across all screens
  • Display a six month calendar, last month, this month, and four months ahead

Some Other Paid and But Good Programs For This Purpose

, which we also recommend if your purpose is not solved from the free alternatives are
  • Ultramon,
  • Display Fusion,
  • Multimon Taskbar Pro
You can search these software on google to find the download website and features, one thing we should say that these paid ones provide much more useful and extra features than the free one which you will love once you use them.

Download 6 Month Free Antivirus License On Facebook

Recently facebook has announced that they are allowing each facebook user to download the free full version of antivirus valid for 6 months, they have taken the initiative as a security measure for all facebook users, so this way you can get the free copy of popular antivirus like Norton, McAfee, Microsoft Security Essentials, Shophos Anti Virus and Trend Micro.
free facebook antivirus
Please Note: Each facebook user can download one antivirus of user choice one time, each antivirus comes with a license of 6 months with free virus definition update during that time. Only one anti-virus software download is allowed for each facebook account. So make sure you select the anti-virus software is which would best as per your computer, as you cant change your choice later.
facebook free antivirus download
The AV Marketplace enables people to download six-month licenses to full versions of anti-virus software at no charge from Microsoft, McAfee, TrendMicro, Sophos, or Symantec. Facebook’s global community can now download for free powerful software to protect their computers from current and future viruses, and content security threats providing hundreds of millions of people free access to anti-virus software.
Download these Free Antivirus For Free from Facebook at this page

Sunday, April 29, 2012

dlink wbr 1310 modem settings


SETUPADVANCEDTOOLSSTATUSSUPPORT

NETWORK SETTINGS :

Use this section to configure the internal network settings of your router and also to configure the built-in DHCP Server to assign IP addresses to the computers on your network. The IP Address that is configured here is the IP Address that you use to access the Web-based management interface. If you change the IP Address here, you may need to adjust your PC's network settings to access the network again.


ROUTER SETTINGS :

Use this section to configure the internal network settings of your router. The IP Address that is configured here is the IP Address that you use to access the Web-based management interface. If you change the IP Address here, you may need to adjust your PC's network settings to access the network again.

Router IP Address :  
Default Subnet Mask :  
Local Domain Name :  
Enable DNS Relay :  

DHCP SERVER SETTINGS :

Use this section to configure the built-in DHCP Server to assign IP addresses to the computers on your network.

Enable DHCP Server :
 
DHCP IP Address Range :
    to  (addresses within the LAN subnet)
DHCP Lease Time :
   (minutes)

ADD DHCP RESERVATION :

Enable :
 
Computer Name :
   
IP Address :
 192 . 168 . 0 .   
MAC Address :
   -  -  -  -  - 
 

DHCP RESERVATIONS LIST :

EnableComputer NameIP AddressMAC Address

DYNAMIC DHCP CLIENT LIST :

Host NameIP AddressMAC AddressExpired Time
end_user192.168.0.10000-05-5d-ce-b3-8dApr/01/2002 04:45:10

Saturday, April 28, 2012

How to block access to the Internet using Firewall in Kaspersky Internet Security 2012


How to block access to the Internet using Firewall in Kaspersky Internet Security 2012?

 ID Article: 6422    Other languages:  Deutsch  Polski  Русский      Views for 7 days 250    Last modified on 2011 Jun 07 12:16 Printable version

Applies to Kaspersky Internet Security 2012
Kaspersky Internet Security contains a special component, Firewall, to ensure your security on local networks and the Internet. It filters all network activities using rules of two types: rules for applications and packet rules.
In order to block access of an application to the Internet, you can create a rule for an application in Firewall settings. to do this perform the following actions:
  1. open the main application window
  2. in the left upper corner click Settings
  3. in the left upper corner select Protection Center
  4. in the left part of the Settings window, select the Firewall component
  5. make sure that the Firewall component is enabled (the Enable Firewall box is checked)
  6. in the right part of the window click on the Settings button
  7. in the Firewall window on the Application rules tab, select the required application
  8. click on the Edit button
  9. in the Application rules window, go to the Network rules tab
  10. click on the Add button
  11. in the Network rule window in the Action section, select Block
  12. in the Name section, select Web-Browsing
  13. if you want the results for the network rule to be logged, check the Log events box
  14. click the OK button
  15. on the Network rules tab the selected rule with the icon Block appears
  16. click the OK button in the Firewall window
  17. click OK in the Settings window
  18. close the main application window.
Useful references  
 

Disable and Turn Off Windows XP Login Screen and Show Traditional NT Log On to Windows Box


Disable and Turn Off Windows XP Login Screen and Show Traditional NT Log On to Windows Box

When Windows XP boots up in multiple users system, by default on startup, Windows XP will display a graphical logon screen with user icons and user names. In this “Welcome Screen”, user can click on his or her username or icon, type in the password (if assigned) and then log on to Windows XP desktop. Some XP may find the Welcome Screen is a beautiful user interface and convenient feature to quickly log in to Windows XP without tying additional long user name.

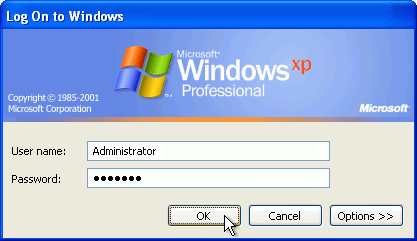
However, at times, Windows XP users may need to use the more traditional and standard “Log on To Windows” dialog box inherited from Windows NT login screen that allows users to key in user name and password. For example, when want to log on to hidden user account such as Administrator account.
XP Log On to Windows Dialog Box
To immediately access and open Log On to Windows traditional and standard login dialog box while on XP Welcome Screen, user can press Ctrl-Alt-Del key sequence twice (same with key sequence for reboot or secure login in NT based Windows). After pressing Ctrl-Alt-Del keys simultaneously twice, Welcome Screen will be changed to logon dialog box with user name and password fields.
To permanently switch to “Log On to Windows” NT styled logon dialog box so that users log on to the computer without using the Welcome screen, instead of using the graphical Welcome login screen, follow these steps:
  1. Log on to Windows XP as Administrator or user with administrative privileges.
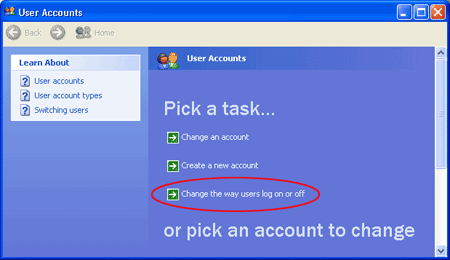
  2. Open User Accounts in Control Panel by clicking Start, click Control Panel, and then click User Accounts.
  3. Click Change the way users log on or off. Disable Welcom Screen in XP
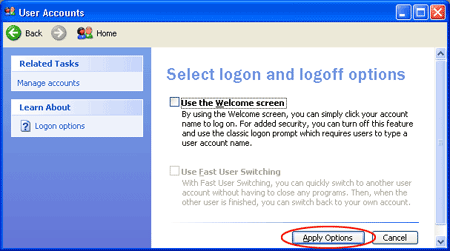
  4. Clear the Use the Welcome screen check box. Turn Off Welcome screen in XP
  5. Click Apply Options button.
Note that by turning off and disabing Welcome screen, Fast User Switching feature is no longer available. To revert and switch back to use Welcome screen in XP, simply tick again the “Use the Welcome Screen” check box so that it is checked.

Friday, April 27, 2012

Sim Card Data Recovery

Sim Card Data Recovery

This image has been resized. Click this bar to view the full image. The original image is sized 756x510.


Quote:
Sim Card Data Recovery Software recovers your mobile phone sim card accidentally deleted text SMS messages. Data Doctor Sim Card Recovery Software is read only and non-destructive utility restore all lost message. Utility retrieve all deleted contact numbers (phone numbers), unreadable messages, corrupt phone book directory. With this tool you can undelete both viewed and unread inbox text SMSes, outbox messages and draft save favorite text messages sent items that have been deleted from sim card memory.

It provides full backup of your cell phone’s erased sim memory. For recovery, you need a phoenix type USB sim card reader or PC/SC Standards based sim card Reader and a PC having Microsoft windows operating system. Sim card reader scans simcard deeply and detects all the recoverable information. Print option provides the facility to print report of all recovered data like your text message and contact numbers. This software provides full details about sim card like its provider and ICC –ID (identification number). It provides restoration of lost or corrupted text files due to virus infection in your mobile phone. Recovery is not possible if sim card is locked (due to unauthorized PIN code). Software ensures recovery even if your inbox, outbox, draft and sent items messages and phone numbers are invisible or unreadable. It fetches recently erased call list.

Features:

* Tool Support recovery on windows XP, 2003, XP Media Center2005, Longhorn, Vista, 2000, NT, ME and 98.
* It is Read only and Non- Destructive sim card data recovery utility.
* Print option provides recovered data on paper in text format.
* Software also shows the provider name and ICC identification number of sim card.
* Utility provides full backup of corrupt or damaged sim card memory.
Code:
http://extabit.com/file/2a1phda4bps9s/SIM Card Data Recovery Software.rar

Wednesday, April 25, 2012

SONY LAPTOP VPCEH18FG drivers

Support for VAIO™ Laptop & Computer

smallLargeLargerAdjust Font Size
Not the product you are looking for?
 
You are searching within the Downloadssection. To search all contents,click here.
  Find my operating system
  What’s this?
Original Drivers and Applications for VPCEH/EJ Series (Windows 7 64-Bit)
Article ID:460803(modified 22 Jun 2011)
Please install the following drivers and applications based from the download order.
Back to Top
File DescriptionDateVersionSizeDownload
SATA Driver23 Jun 201110.0.0.104611.20 MB
Chipset Driver23 Jun 20119.2.0.10213.45 MB
Intel Graphics Driver23 Jun 20118.15.10.229182.10 MB
NVIDIA Graphics Driver23 Jun 20118.17.12.6721169.73 MB
Audio Driver23 Jun 20118.54.0.539.34 MB
Ethernet Driver23 Jun 20117.40.126.20111.96 MB
Memory Card Reader23 Jun 20116.1.7600.7711.15 MB
Atheros Wireless LAN Driver23 Jun 20119.1.0.3342.42 MB
Intel Wireless LAN Driver23 Jun 201114.0.2.241.95 MB
Pointing Driver23 Jun 20117.106.511.10323.37 MB
SFEP Driver23 Jun 20118.0.1.21.35 MB
ME Driver23 Jun 20117.0.0.11446.72 MB
Bluetooth Driver23 Jun 20117.3.0.95126.89 MB
Back to Top
File DescriptionDateVersionSizeDownload
Sony Shared Library23 Jun 20115.9.0.012203.66 MB
Notebook Utilities23 Jun 20111.084.91 MB
VAIO Smart Network23 Jun 20113.5.0.0228014.54 MB
VAIO Location Utility23 Jun 20111.1.00.060602.27 MB
VAIO Update23 Jun 20115.4.0.1530028.84 MB
VAIO Gate23 Jun 20112.3.0.1109013.79 MB
Quick Web Access23 Jun 20111.4.5.3253.83 MB

Additional Resource

  • »
    Contacting Sony
    Got a suggestion, feedback or comment? We’re happy to hear from you!
  • »
    Service Centres
    List of Sony offices in India that provide sales and after-sales service activities.
  • »
    Retail stores
    List of Sony retail shops in India